The Squire’s Tale is a point-and-click puzzle adventure in the AE Mysteries series. I really enjoy the series because the stories are well written, and there’s plenty of humor and intrigue as well as some tricky puzzles and object finding. This one is listed as a beginner adventure, but if you want to complete it without using hints it can still be testing, so read on for my full walkthrough (with puzzle solutions) to The Squire’s Tale.
The Squire’s Tale Guide – Adventure Escape Mysteries
If you’ve played any AE Mysteries games before, you’ll be on familiar ground with The Squire’s Tale. Click items on the screen to interact with them or pick them up and add them to your inventory. Items can also be used from your inventory in close-ups after you click particular details. Stars you collect can be used to provide you with clues if you get stuck, but that shouldn’t be necessary if you follow my guide below.
Related: On Thin Ice – Full Walkthrough & Solutions (Chapters 1-4)
In The Squire’s Tale, you’ll play as our squire hero Martin as he attempts to guide his foolhardy knight boss Cedrick to recover the Royal Ruby and then save the realm. You begin on the trail of goblins and have found your way to a cave entrance. Below you’ll find the solution to chapters one and two. For later chapters, follow these links instead:
- The Squire’s Tale – Full Walkthrough, Chapters 3 and 4:
- The Squire’s Tale – Full Walkthrough, Chapters 5 and 6:
- The Squire’s Tale – Full Walkthrough, Chapters 7 and 8:
Chapter 1 – Entering The Goblin’s Lair
Pick up the Tunic (a1), Torch (a2), Statue Horn, and Statue Arm (a3). Select the torch in your inventory (the background of it will go dark blue) and use it to remove the plants (a4). Click the cave entrance this reveals for a close-up and take the Shovel and Hammer. Use the hammer on the pillar in the close-up (above the skull) to reveal an alcove and take the Goblin Dictionary and Animal Statues from inside.
Use the shovel on the dirt pile (a5) and click the box that’s revealed to find a locked box. To open the box, use the number 3574 and then take the Goblin Glue. Click the goblin statue (a6) and use the glue to affix the horn and arm back in place (use the glue on the close-up first, then the two broken items). Click the water bottle (a7) to get a Damp Tunic, then use the tunic on the Shield (a8) to clean it, revealing a goblin face.
Add the animal statues to the spare plinth next to the goblin statue in the close-up. Use the dictionary to read the plaque on it which says Aided by one with the hard shell of a warrior. Click the animal statue until it is a red crab. Click the other plaque to see it says Gobby rose from the flames, so click the base until you see flames. If you look at the goblin sign (a9) you’ll note its arms are both raised, so move the central section to match. The cave will open.
Once inside, Cedrick will attack the goblins in a minigame. Do the following:
- Move right
- Attack up
- Whirlwind attack
On level two, follow this pattern:
- Move down
- Move down
- Attack right
- Charge up
On the final level:
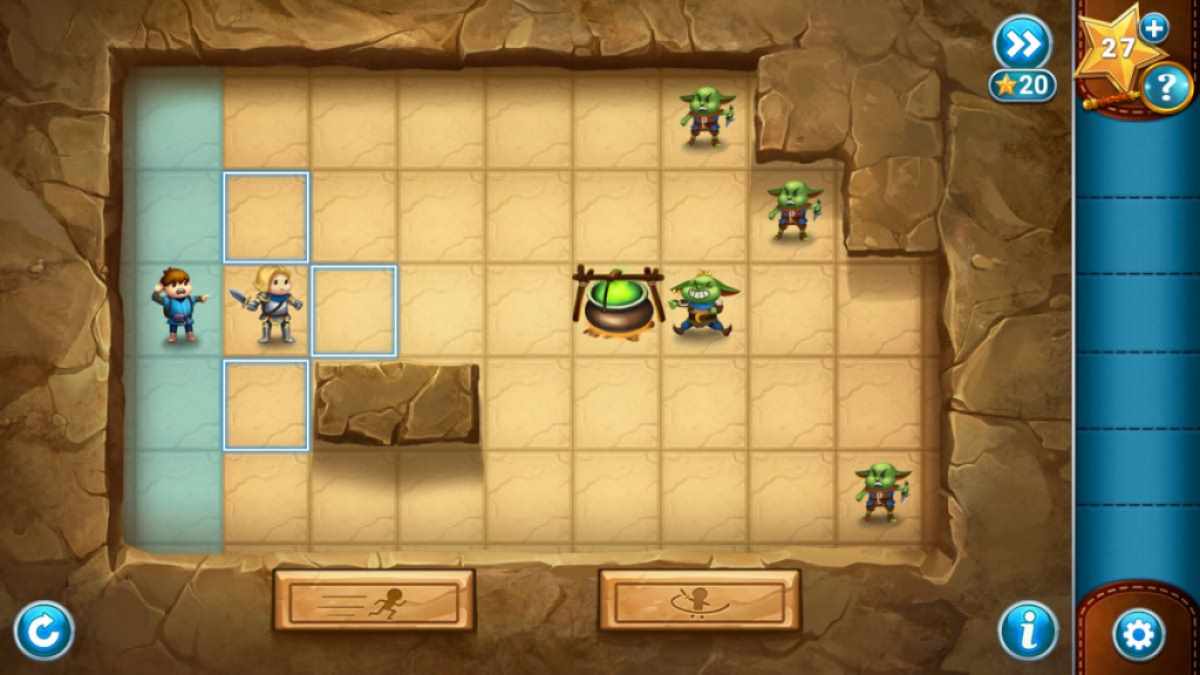
- Move right
- Move up
- Move right
- Move down
- Move left (x2)
- Rush down
- Move up (x2)
- Move right
- Attack the King
Inside The Goblin’s Lair
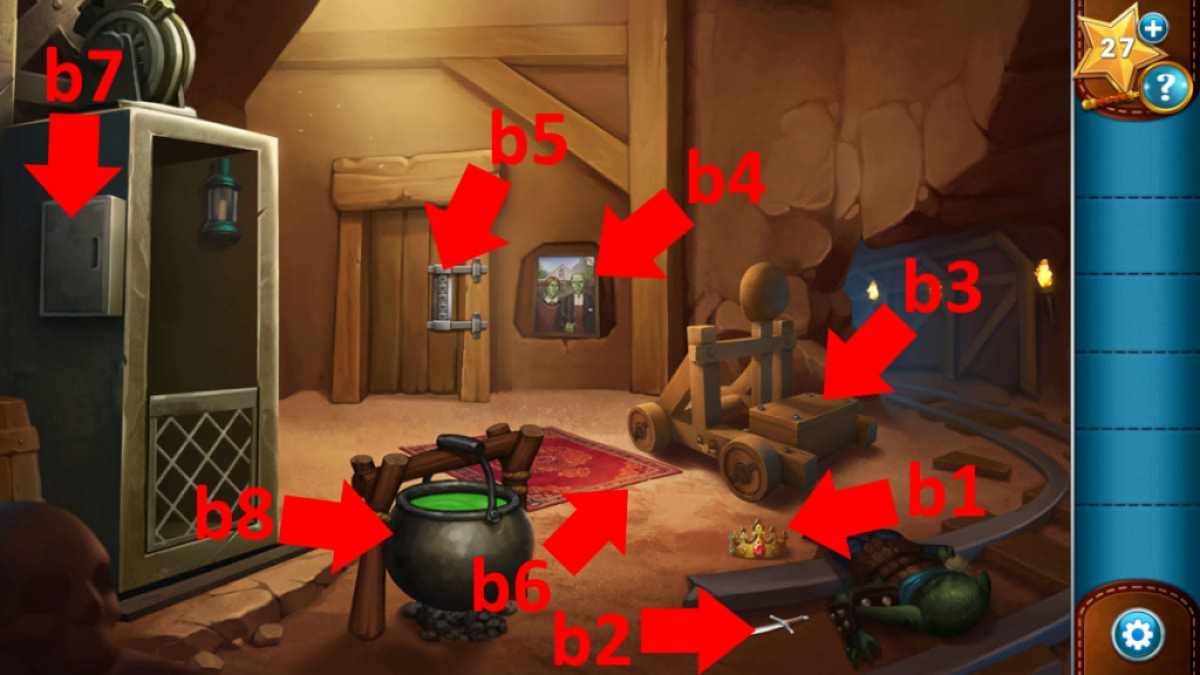
Take the Crown (b1) and Dagger (b2), then use the dagger to open the box (b3) and take the Gear. Click the painting (b4) for a close-up and click the top-right corner, where it is coming away. Cedrick will rip it, revealing a sun. Note the positions (from top to bottom) of all the shapes that look out of place:
- Sun
- Diamond
- Spade
- Skull
- Crown
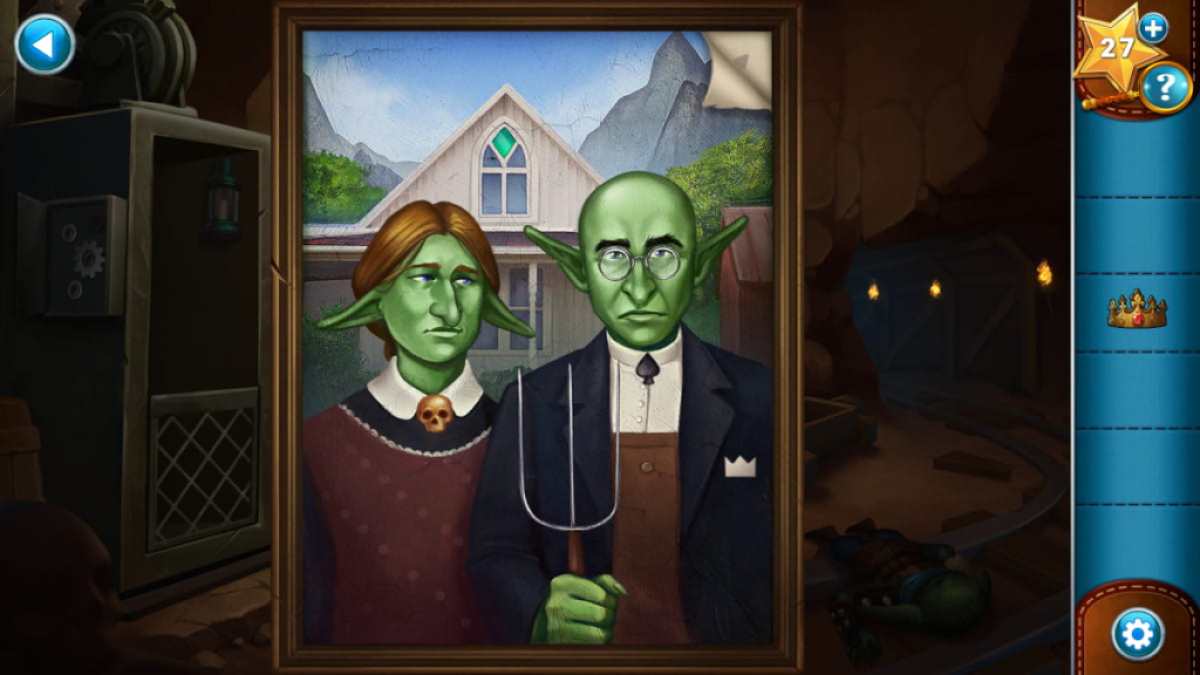
Back on the main image, click the door lock (b5), and enter the code above. With the door open, take the Second Gear. Click the rug (b6) to reveal and take the Third Gear. Open the box on the side of the elevator (b7), add the three gears, and the elevator will be fixed. Click the elevator to head down to the vault.
The Goblin Vault
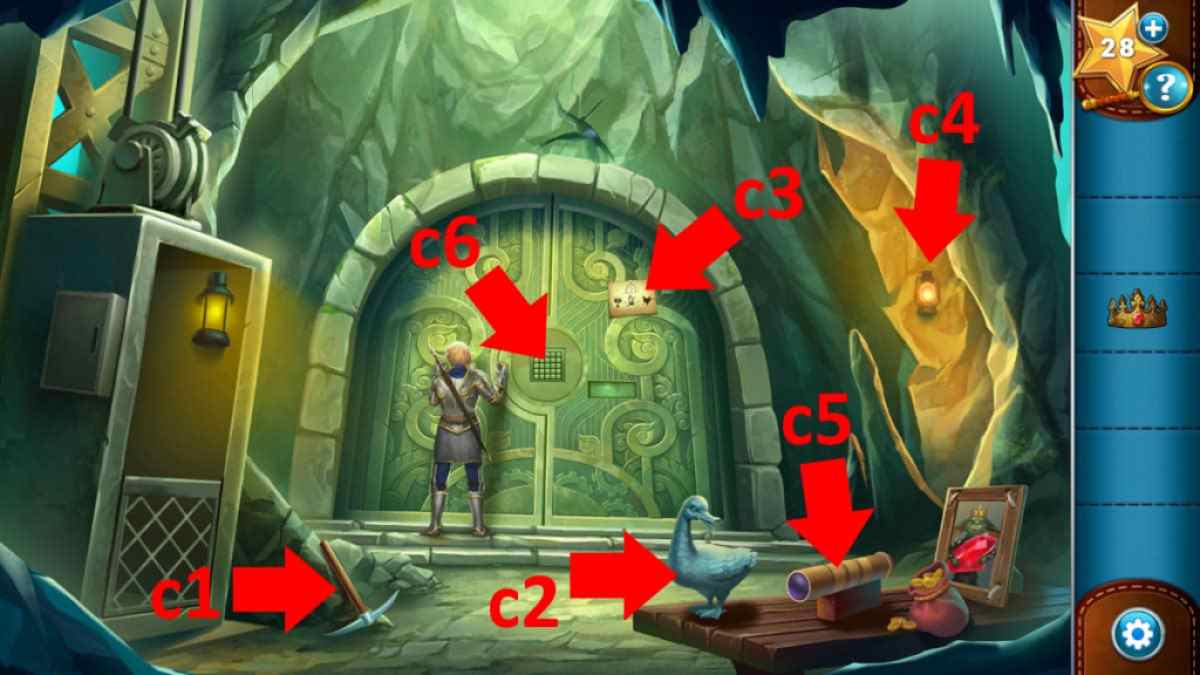
Click the Pickaxe (c1) and Heavy Duck Statue (c2) to collect them, then click the note on the vault door (c3) for a clue on how to collect the three gems you need to continue. Click the torch (c4) to turn it off, revealing the Blue Gem. Use the pickaxe on the blue gem and collect it.
Related: Haunted Hunt Walkthrough – Adventure Escape Mysteries
Click Cedrick, who’ll complain he needs something heavy to smash the door with. Give him the duck statue, which will lead to a box falling from a crack above the door. Take the Flint and Tinder from inside, then use the lift to go back to the goblin lair. Use the tinder to light the cauldron (b8), add the crown to it, and collect the Red Gem. Now you can use the pickaxe on the door (b5) here and knock down the book.
Open the book, turn to the chicken (red) section, and take the Yellow Gem from the hidden compartment in the book. Go back up to the vault and add the blue gem, red gem, and yellow gem to the Kaleidoscope (c5), starting a puzzle.

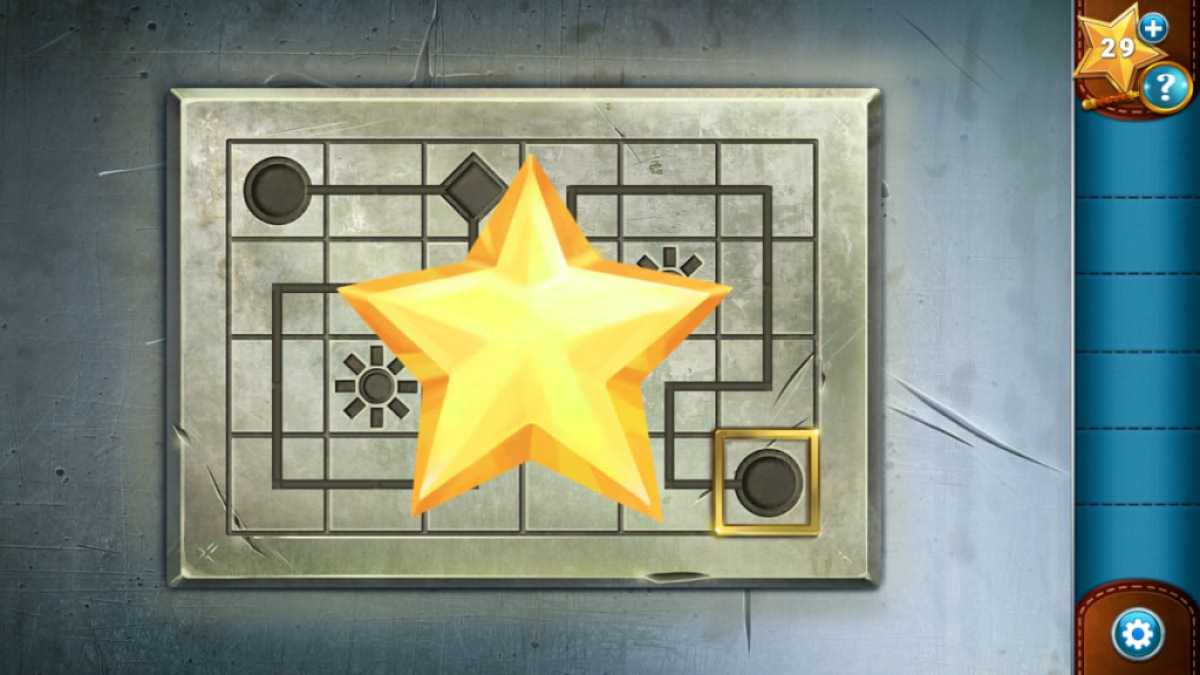
Twist the colored dials until they fit the squares (see image above). Now click the vault door mechanism (c6) and click all the squares that don’t have colors on the kaleidoscope. The vault door will open to reveal… another vault door.
All you need to do is click the puzzle in the middle of the door again, and drag the square from the bottom left to the bottom right, then to the top, then all the way left to the other circle. Which takes you to the next vault door.
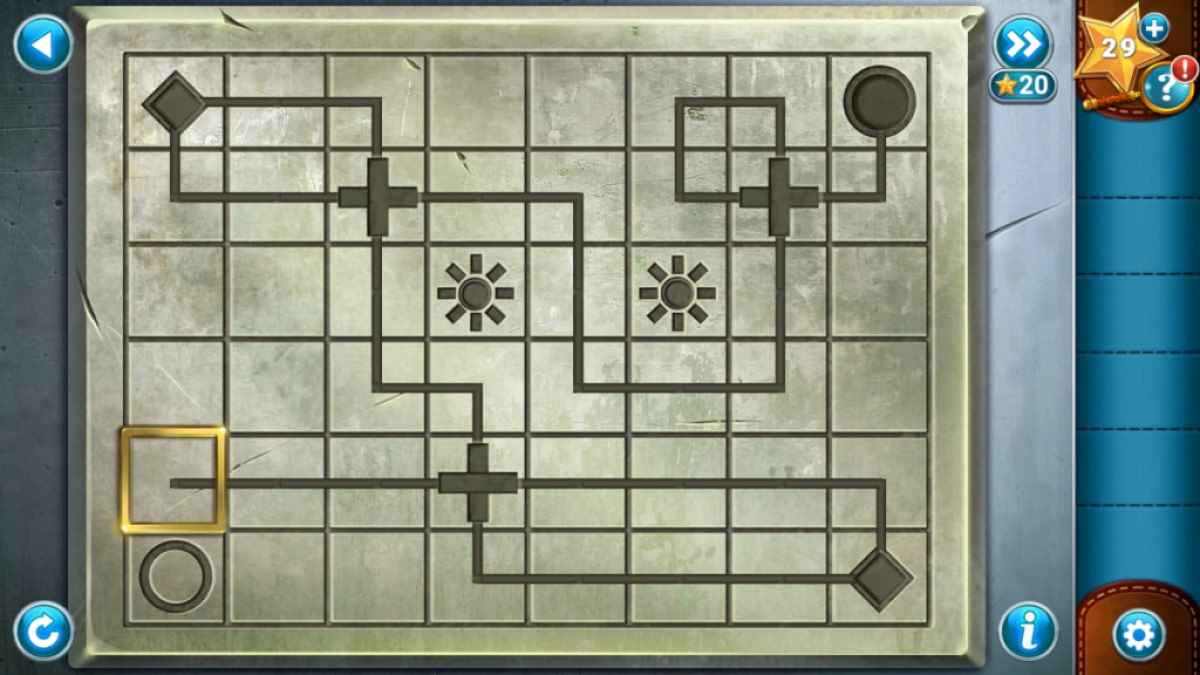
Follow the image above for the next door (draw from circle to diamond, down one, anticlockwise around the sun, clockwise around the right-hand sun, then down and right to the circle), and then the one below for the final door. With the vault open, click the Ruby to have Cedrick collect it and complete Chapter 1.
Chapter 2 – Grim Tops Mountain
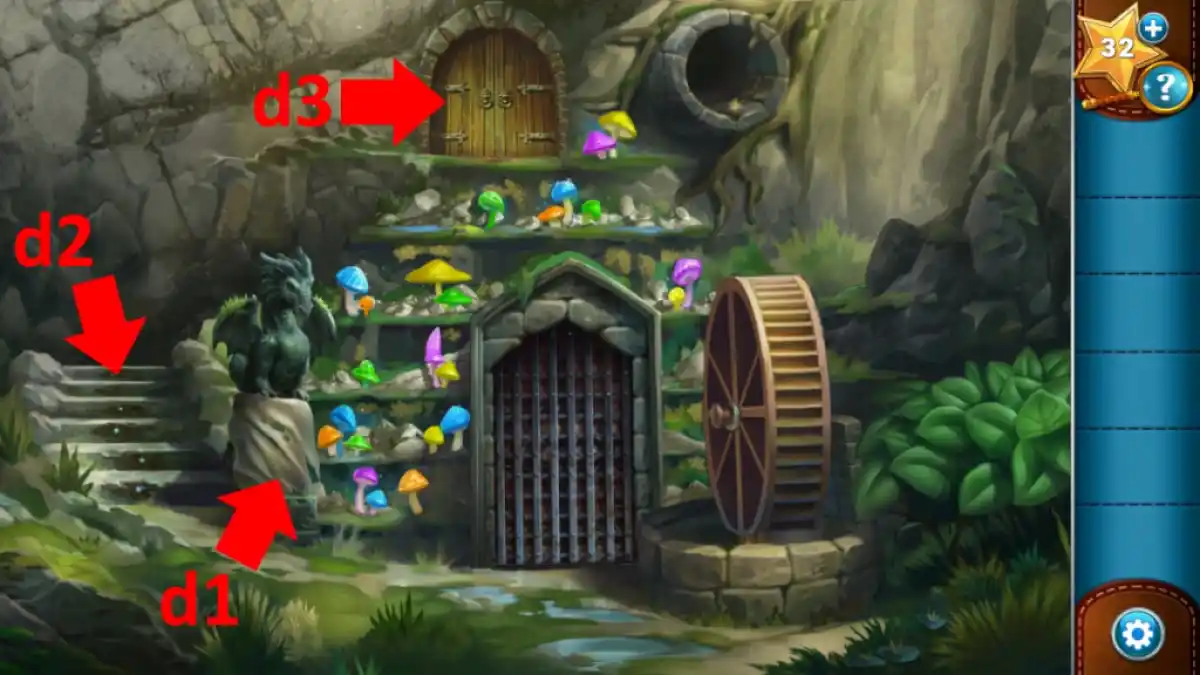
Once the story moves on, you’ll find yourself faced with two doors and a waterwheel. Click the Old Cloth on the dragon (d1) to pick it up and read the plaque underneath. Select the stairs (d2) and use the cloth to clean them and reveal symbols. Set them as follows by clicking each step symbol until this number of lights are on, top to bottom, 246353. You can now head through the door at the top of the steps.
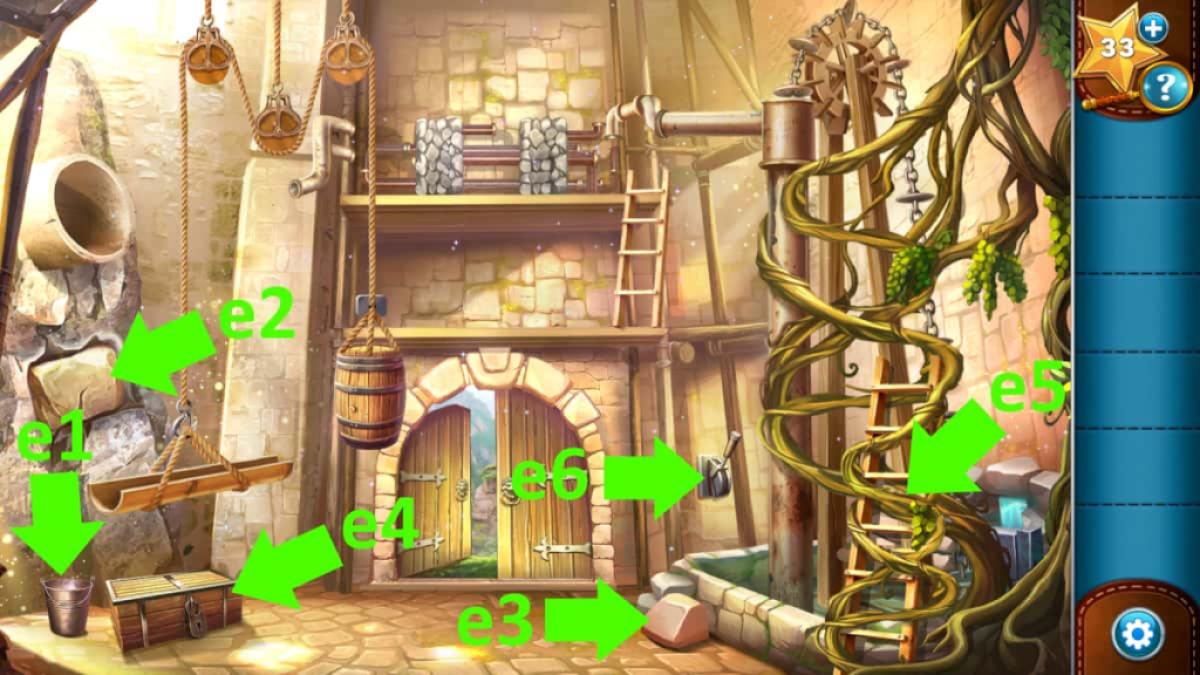
Once you’re in the pump room, take the Bucket (e1) and click the stone (e2) to reveal and take the Wooden Gear. Click the other loose stone (e3) to get a Chest Key, use it to open the chest (e4), take the Axe from inside, and use the axe to remove the vines (e5) and get the Ladder.
Place the ladder below the other one, giving you access to the upper level above the door. Also, use the axe on the vines a second time to remove the rest of them completely. Click the base of the pump (where the ladder was) with the gear elected to add it to the bottom of the machine. Now you can click the lever (e6) to fill the pool with water (see image below).
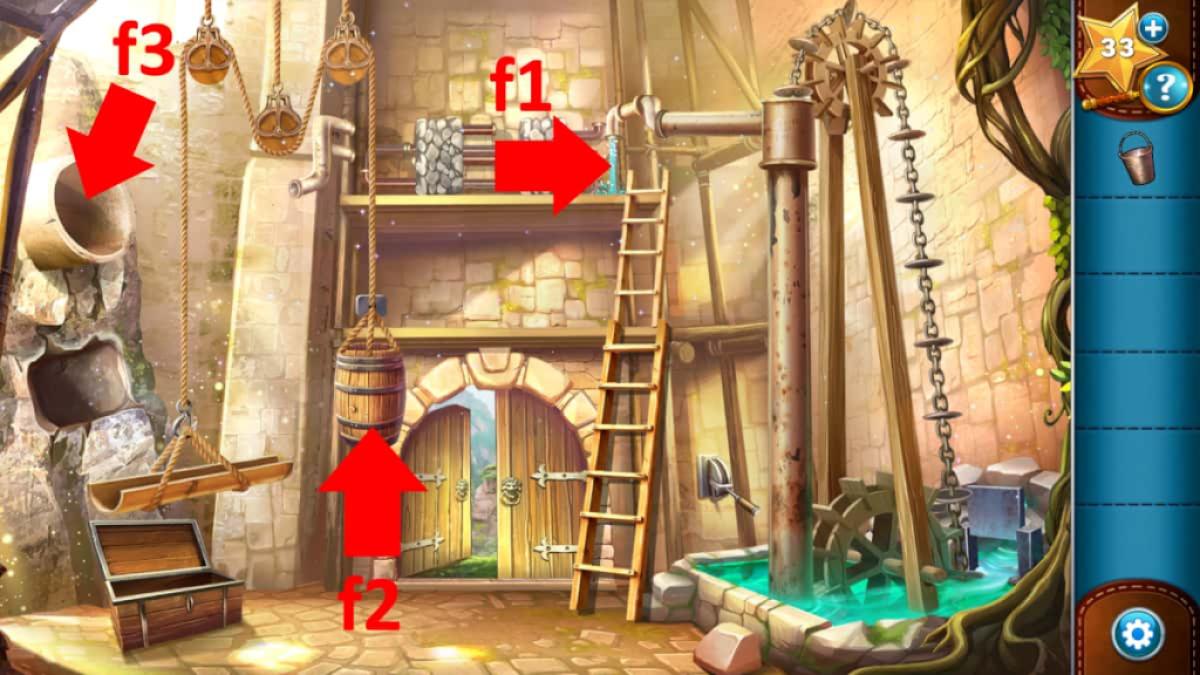
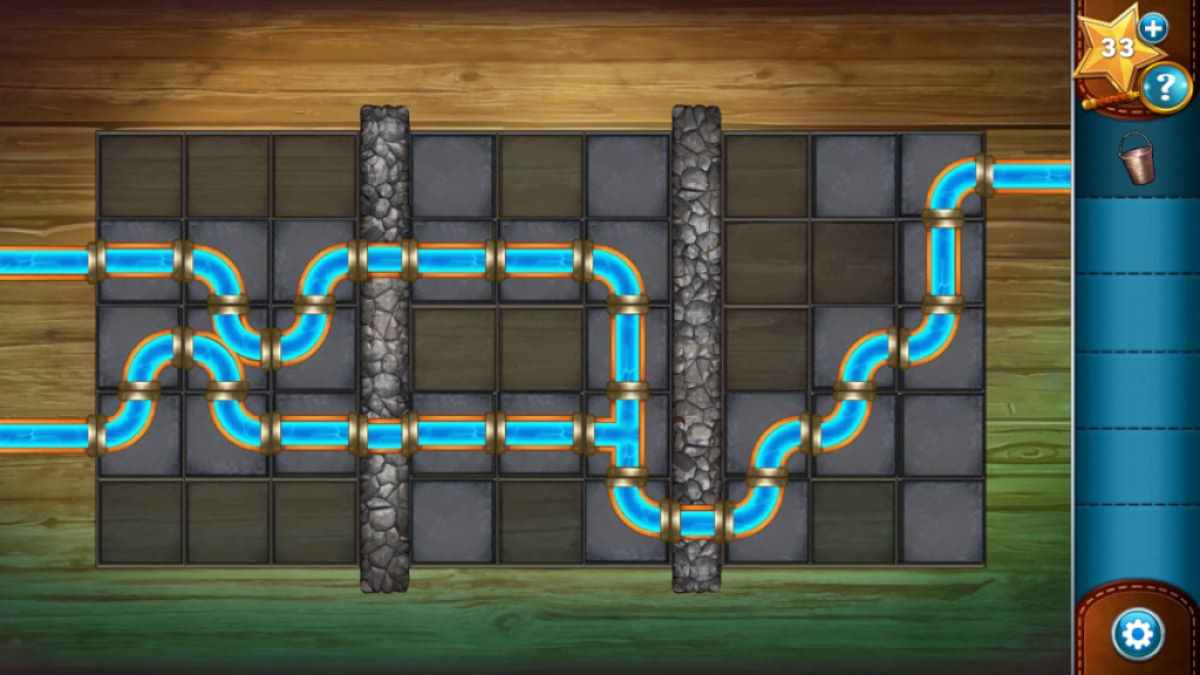
Use the bucket on the stream of water (f1) to enter a pipe puzzle. You can’t fail here, as you can keep moving pipes until it is complete. See the solution below.
Use the bucket again, this time on the big stream of water, to get a Bucket of Water. Use the bucket of water on the barrel (f2) and repeat the process twice more, so that the barrel is on the ground and the pipe completes the system, meaning the water is going into the pipe on the left (f3).
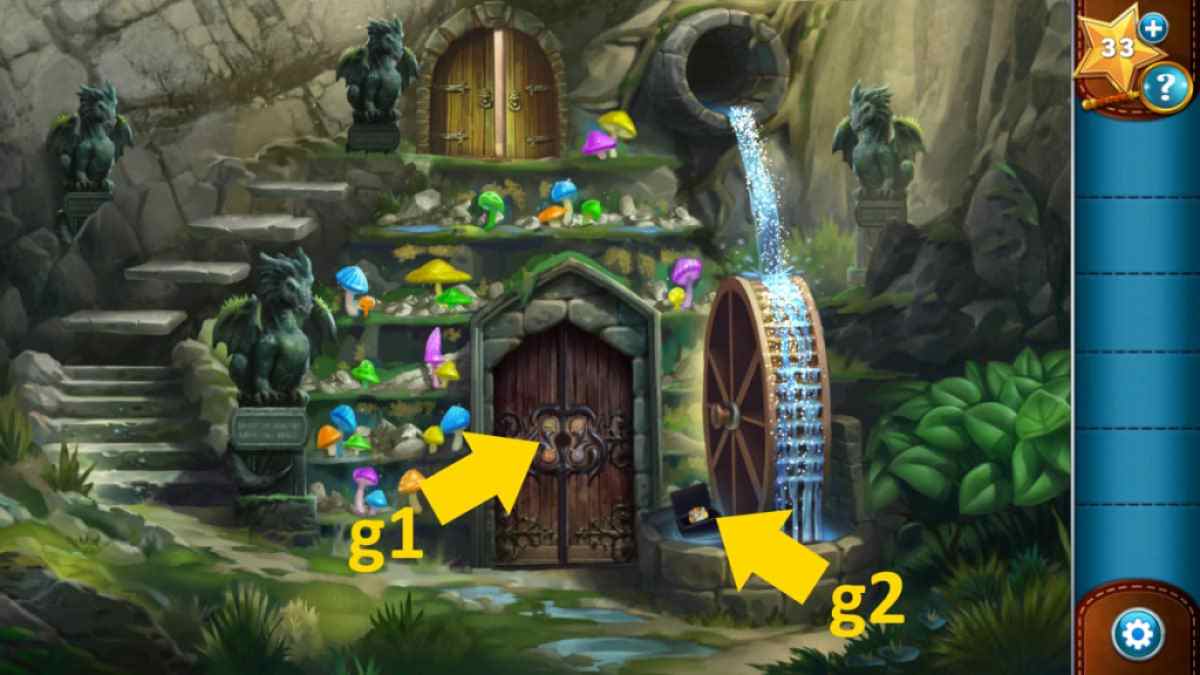
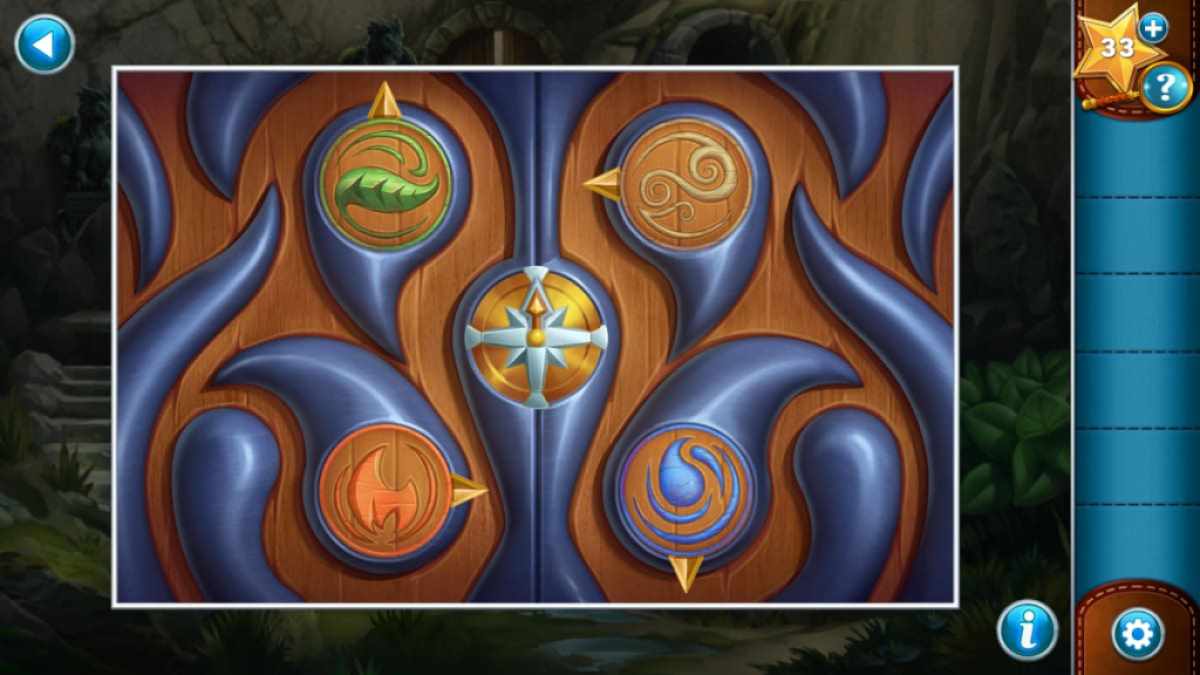
You’ll now move outside once more, but clicking the door (g1) reveals something is missing. Click the box in the water (g2) and take the Compass, then add it to the center of the door (g1). To work out the directions to put the pointers on each symbol, you need to read the plaques on the dragons:
- Fire (red): East
- Life (blue): South
- Wind (white): West
- Earth (green): North
You can now head through the open door into the caves beyond.
The Sleeping Dragon
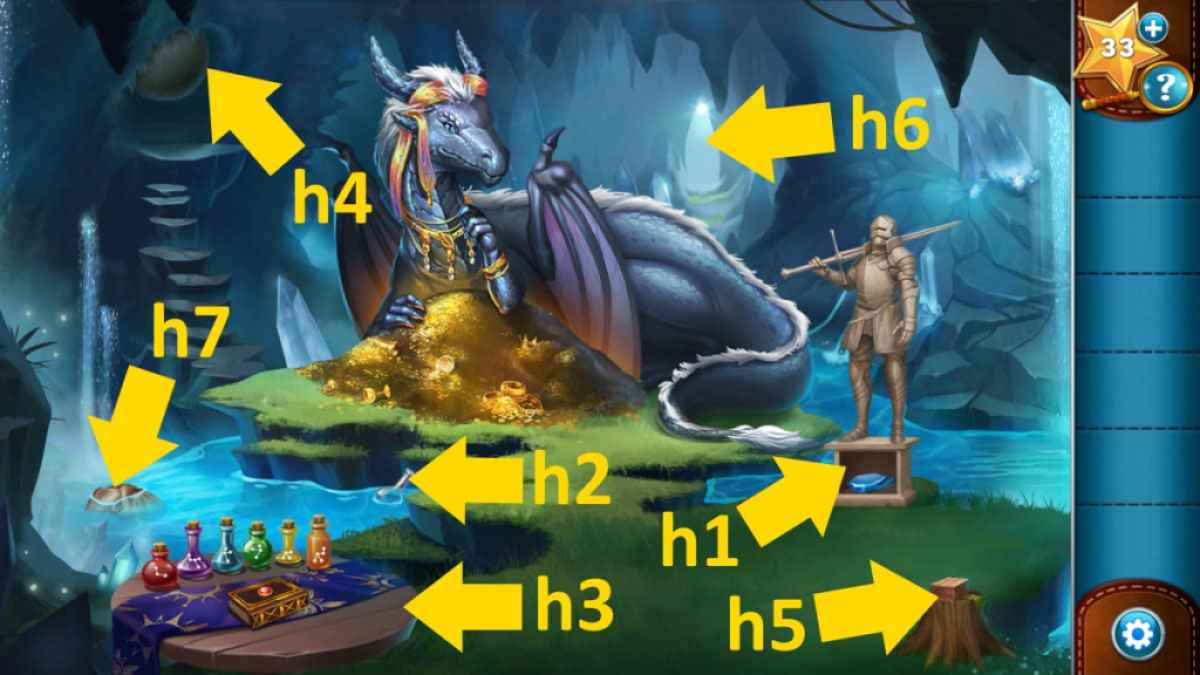
Select the broken statue (h1) and place the pieces on top of each other (by dragging them) to rebuild it (see image), then take the Gem from inside the base. Grab the Empty Flask (h2), then select the table (h3) for a close-up and take the Potion Book. Read the book, then add the flask to the table and click the ingredients in the correct order (purple, blue, yellow, red, green, orange), and take the Strength Potion.
Related: Echo Bay Murders – Chapter 1 Walkthrough
Click the boulder, and Cedrick will move it out of the way, letting you up to the Griffon’s Nest. Take the Hammer there, go back into the dragon’s cave, and use the hammer to open the box (h4) and get the Flint and Steel. Click the box once more to remove it and take the Black Powder underneath. Go back to the nest, add the powder to it, then use the flint on it, scaring off the Griffon. Take the Griffon Egg and give it to the dragon. Click the back of the cave (h5) to move out to the terrace.
The Terrace
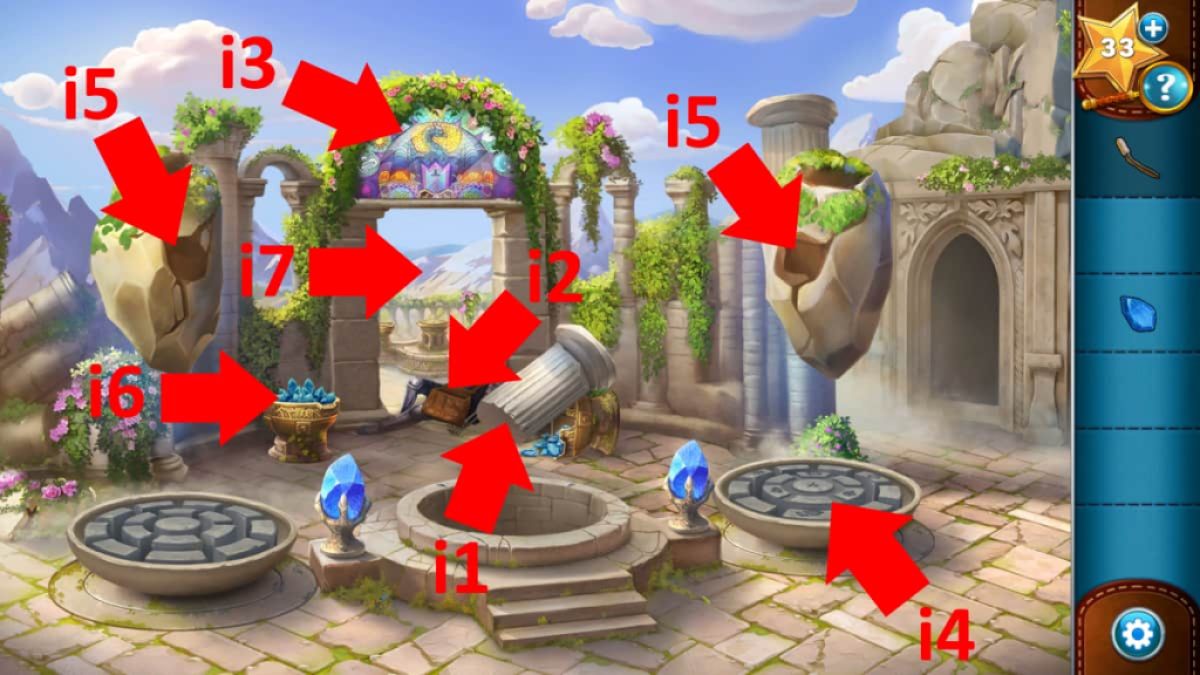
Click the broken pillar (i1) to move it, then click the knight’s bag (i2) to get a Torch. Select the ornate picture (i3) for a close-up, noting the order of symbols in the images above the dragon (wind, sun, mountain, star, fire, cloud, moon). Now select the right-hand dish (i4) for a close-up, click the symbols on it in this order, and take a second Gem.
Add the two gems to the two floating rocks (i5) to fill the dishes with water and light the flame (i6). Use the torch on the flame to get a Lit Torch, then click the area behind the knight (i7) for a close-up and use the torch to light the braziers and take the Net from the right side of the close-up.
Go back into the dragon cave and use the net in the water (h6) to fish out a cloth bundle. Click it to get the Dragon Bust. Now go back out to the terrace, add the bust to the central pedestal in the area behind the knight close-up (see image), and complete the stone ring puzzle. You first need to make a path from the white stone on the left to the left half of the central stone (at which point it turns blue), then do the same on the right-hand side. You can’t fail here. Once complete, the altar appears and you’ve completed chapter 2!
Continue your journey with The Squire’s Tale – Full Walkthrough, Chapters 3 and 4 right here at MyFullGames!