The Abandoned series are point-and-click mystery games found on the website Cool Math Games that task you with venturing into different dimensions to find your brother. In the first Abandoned game, you make your way to Tibet and enter an alien world uninhabited by life of any kind, solving puzzles and gathering notes to get to the bottom of your brother’s disappearance. The second game has you travelling to another new dimension, this time in a forest, but once again there will be plenty of puzzles for you to solve along the way.
Solving every puzzle in Abandoned 2
The starting area and the temple puzzle
First off, head through the door at the beginning of the game to enter the new forest dimension. Head left until you hit the ladder built into the tree, then head all the way down to the bottom. On the way down you’ll notice a circular switch on the right side of the tree trunk that you can spin. Spin the switch until the line in the middle is vertical. Move one room to the left and pick up the hand saw in the bushes, then make your way back up the ladder.
Head right until you find the hanging tree vines and click on them. They will fall down, allowing you to climb them. Head all the way up the vines, then head left. Use the hand saw to cut the wooden stick and pick it up.
Head back down the vines and head left until you see the strange contraption on the ground. This is a ladder system that requires the wooden stick to function. Attach the stick to the left side of the system to activate the ladder, then pick the stick back up as you’ll need it later. Climb down the ladder until you reach the bottom.
From here, head left and read the message from your brother on the tree, as this one gives a hint about heading to a temple next. Head up the ladder next to the note and grab the shovel, then turn the circular switch next to it until it is horizontal. Then, head back down before going right.
Keep going right until you reach the temple door. The entrance to the temple is the doorway all the way to the right that is surrounded with symbols, not the hole in the ground before it. Head inside the temple and pick up the old key hanging within before going upstairs. Here you’ll find the puzzle your brother referenced. Though at first it looks complicated, the solution is to hit the first three arrows once to the right. Doing this will immediately solve the puzzle. Once completed, the puzzle will glow like this:
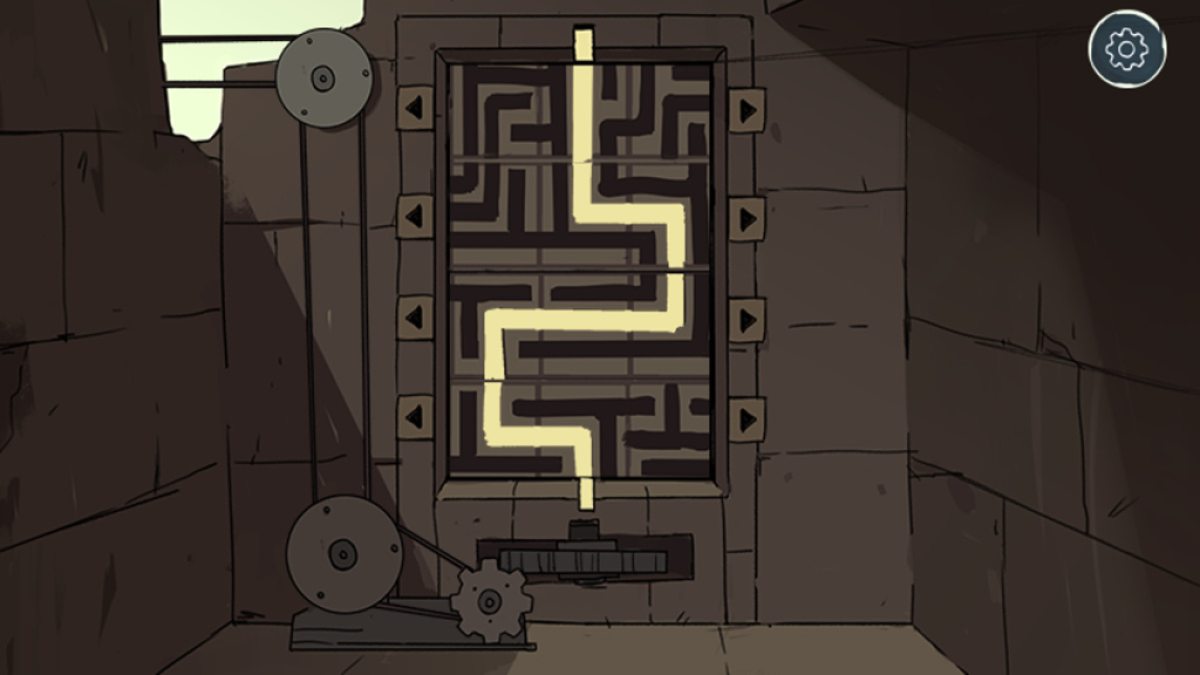
From here, head all the way back to the first door. You’ll find a ladder has descended from above that you need to climb up. When you get to the top, use the switch to raise the ladder so that you can’t climb back down. Then, head up the ladder built into the tree and head right past the hovel. You’ll find another contraption that you need to attach the stick to. Activate it to create a bridge that you can take to the right, allowing you to descend using the vines you pulled earlier.
Head all the way back to the temple puzzle you solved previously to find it has been replaced with climbable alcoves. Head up and grab the skinny key you find there, then take the ladder on your left. Head all the way up the tree to the very top. You’ll know it’s the top because there will be a small cube space with a skull carving next to it. From here, head left and click on the hanging key in the branches. This will cause it to fall down a level, so you need to head down the ladder and all the way left to pick it up.
After picking up the key, head back down to the level where the hovel door was earlier. It will be the room to the left of the contraption you left the stick in. You’ll know it’s the correct room due to the three doors within it:
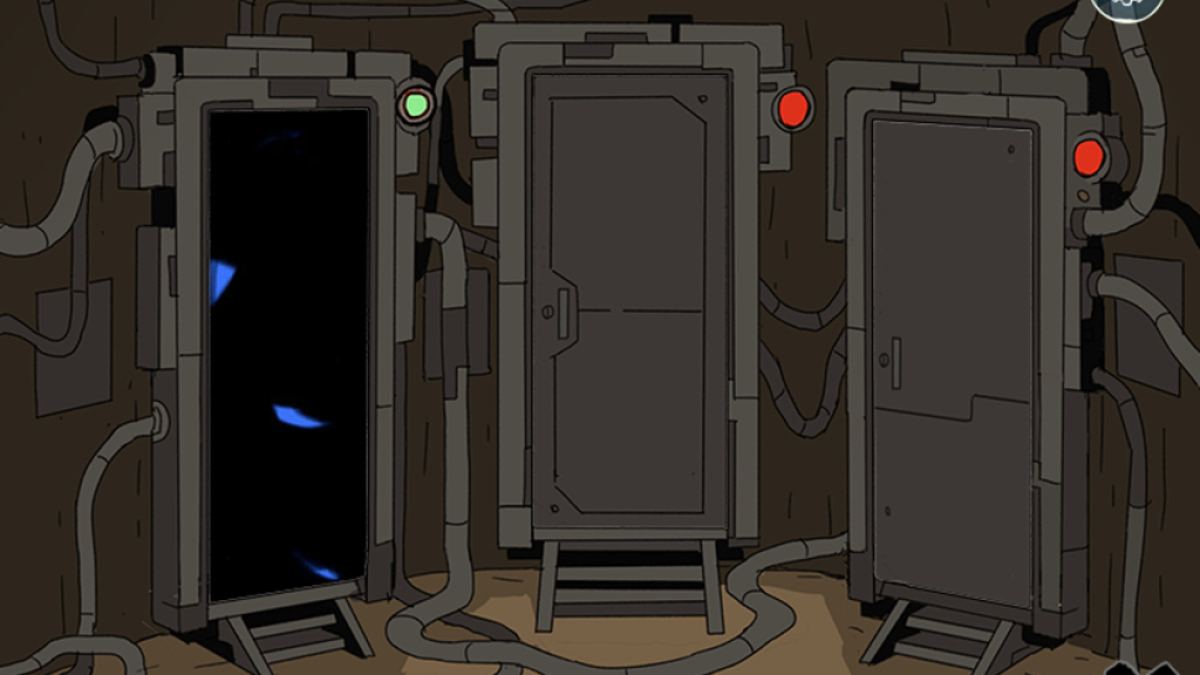
Pick up the skull room cheat sheet on the ground, then use the hanging key on the leftmost door before heading through it.
Related: Best Games on Cool Math Games in 2023
The desert world and the skull room puzzle
Through the door you’ll find the desert world, a world entirely separated from the forest one you were in before. Head left until you see some uneven dirt on the ground, then use the shovel on it to reveal a hidden room. Go into it and try pressing the two buttons and switch within. Head back out and one room right to find a strange pillar coming out of the ground. You may notice a piece of it is missing. Head back left and a floating elevator will descend from the sky that you can enter and ascend.
Exit the floating elevator and head right. There will be a note on the wall from your brother explaining the skull room. There is nothing of note to the right in the room. From here, head back to the underground room below the floating elevator and pick up the green cylinder and the spare part on the shelves below the switch.
Head up to the strange pillar and attach the spare part to the hole in it, then head back down into the hidden room. Flip the switch, then head back to the strange pillar again and it will start firing a laser into the sky. From here, take the elevator back up and head all the way right into the room past the note about the skull room. Within, the electronics will be lit up. You’ll notice a trapezoid key to the right that you can now access thanks to the electricity. Open the door and pick it up, then make your way out of the desert world.
Head out of the three doors room and descend a level to the area with the switch and ladder. Head to the left and use the old key on the door there. Head inside and then head into the room within. You’ll see what looks like a torture device and chair inside. In the torture device there will be another green cylinder that you need to take.
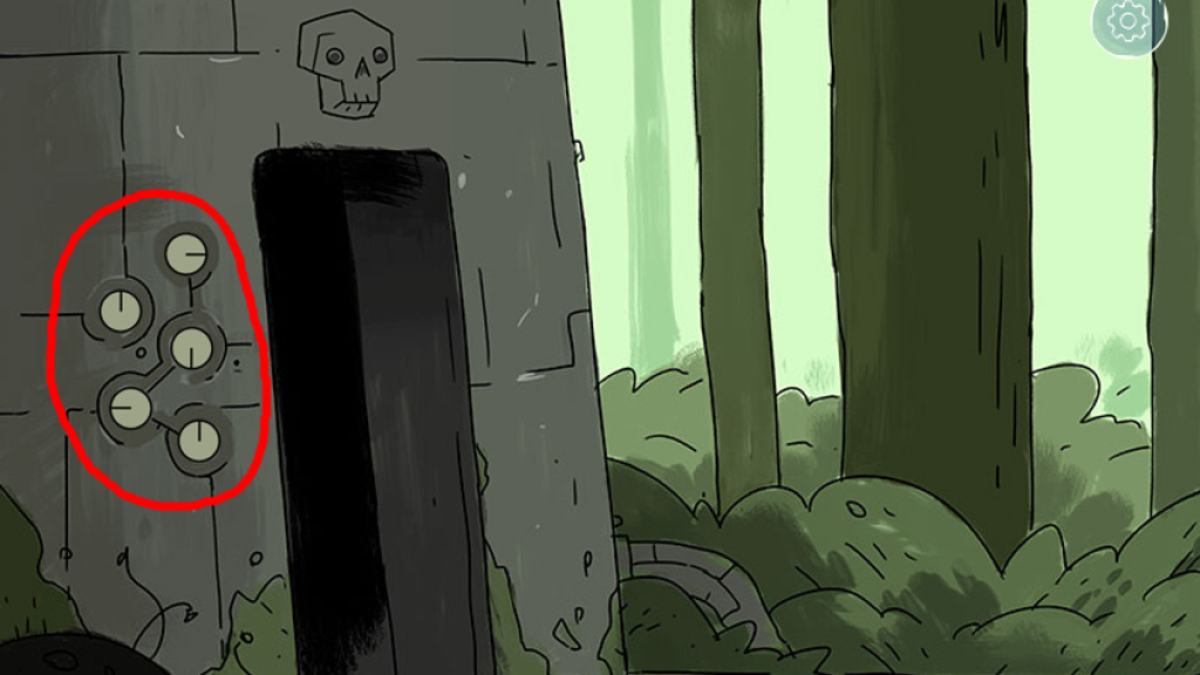
From there, head back to the area you originally found the hand saw in to the left and below of the first door. Head all the way left until you reach the skull door. Here, there will be a puzzle identical to the skull room cheat sheet you found earlier. To solve the puzzle, rotate the dials until they match the cheat sheet, and the door will open. If you’re having trouble the end result will look like this:
Head inside and you’ll find a structure in the middle of the room with two holes in the top. First, pick up the symbol machine on the wall behind it. Then, take your two green cylinders and insert them into the holes. Doing so will unlock a shaft that leads down into a room with a strange blue machine taking up most of it. Ignore it for now.
Head all the way back to the hovel with three doors and use the trapezoid key on the right door. This will allow you to step through into what looks like a space station. Head left and pick up the brown key in the alcove, then head further left and use the red button on the broken button to use the door. This will reveal one of the secret symbols as well as let you descend to the desert world from the space station. After this, immediately head back out of the space station.
From here, head out of the hovel and up the ladder next to it, then head left to the hovel with stairs in it. Climb up the stairs then find the door next to the hovel’s exit:
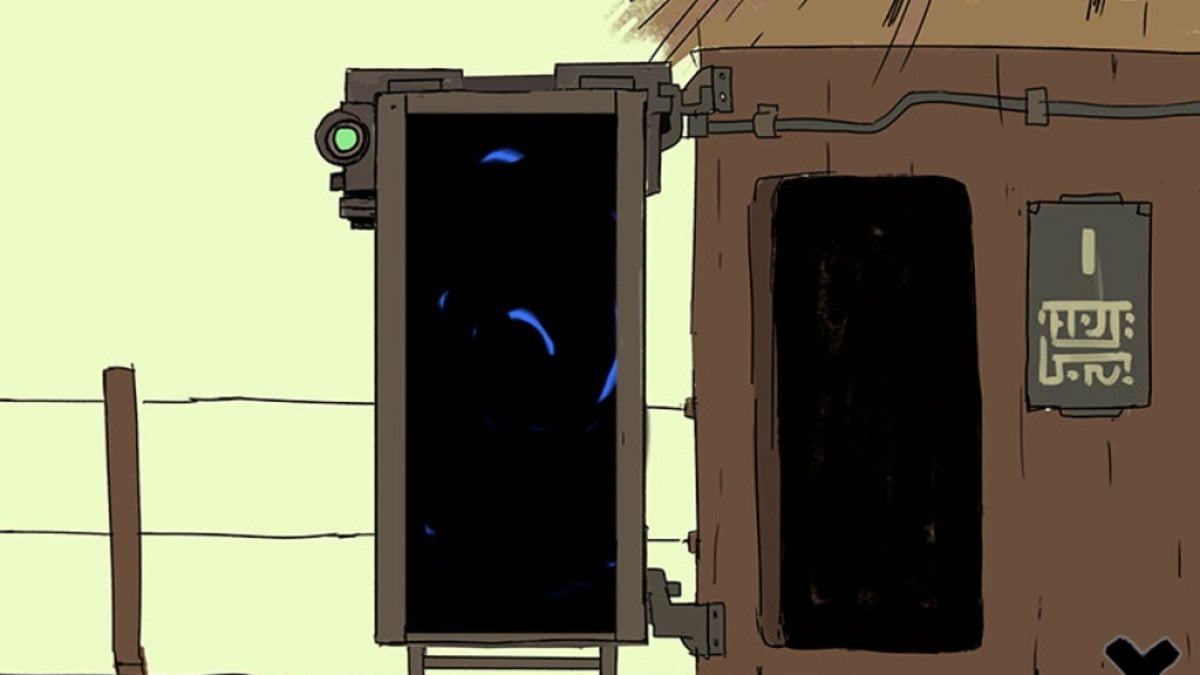
Open the door using the brown key and you’ll step into a room with a ladder. Head up the ladder and grab the pyramid out of the wall on the left. From here, you need to head to the hole in the ground that you passed before the temple puzzle in the forest. Use the pyramid in your inventory on the large pyramid in the hole and a secret passage will open. Descend below until you find the room with a humanoid suspended in a box. There will be a spare part to the left of the humanoid that you need to pick up.
After picking up this spare part, you need to head to the hovel entrance that contains the stairs inside. Next to it is a door. It will look like this:
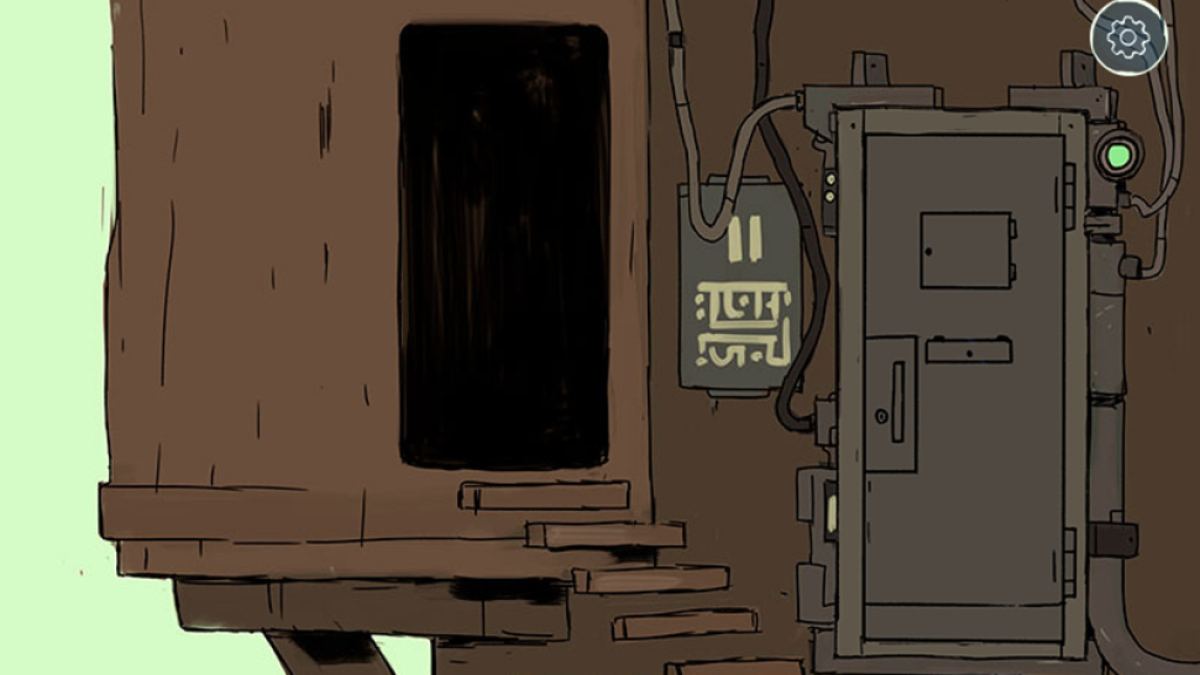
You need to use the skinny key on this door to open it. Step through and you’ll find yourself in a red staircase. Descend one level and use the symbol machine on the wall in front of you. Doing so will reveal handprints on certain blocks. Click these blocks in order and the wall will shift, revealing a room behind it.
Related: How to beat Trace Escape Room – Walkthrough and Answers
The glowing symbol box puzzle and the combination lock puzzle
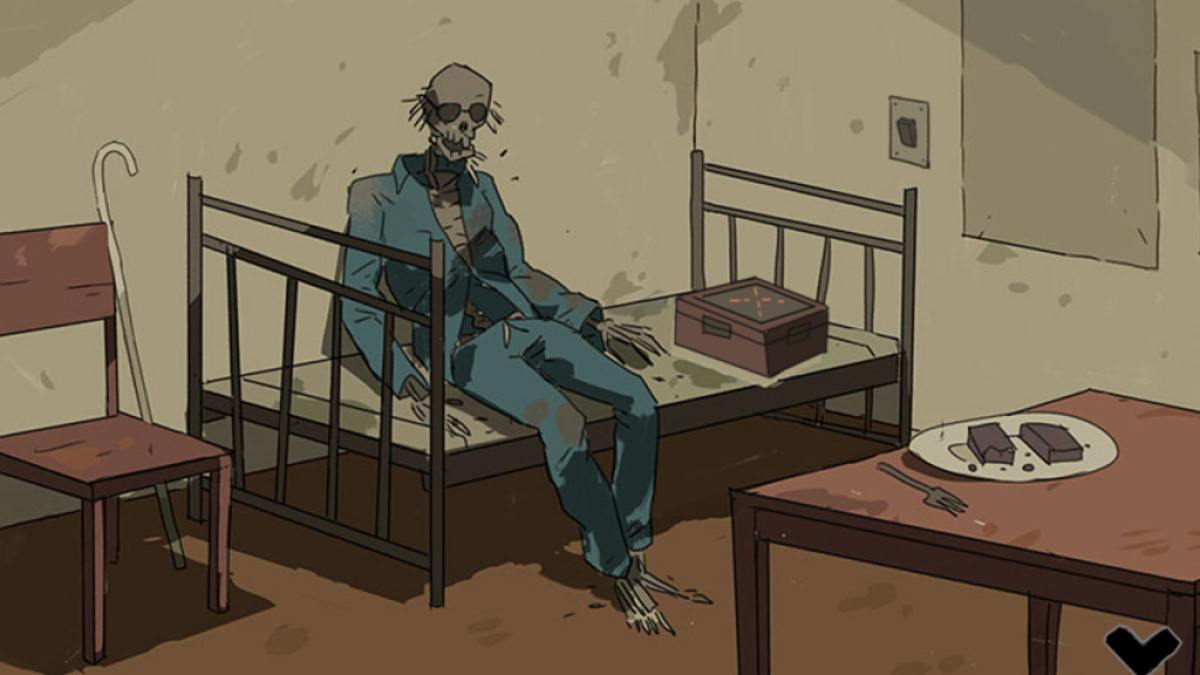
Within this room there will be an adjoining room with a skeleton and a box with symbols. Before going to the adjoining room, pick up the red button on the ground. Then, when you go to the adjoining room, turn off the lights in the room and use the box’s on switch to start the puzzle. To solve this puzzle, you need to sort the glowing green symbols based on the black symbols at the end of the box’s rows. For example, the x squares need to be in the x column. The symbols can be moved a distance equivalent to two spaces away as long as it is open. Once you get all of the symbols in the correct spaces, the box will open and reveal a reverse trapezoid key.
Head back to the hovel with three doors and use the trapezoid key on the center door. This will take you to an area with nothing but a combination lock puzzle in it. Between the last puzzle and this one, the game serves up two of its hardest puzzles back-to-back, so be ready for another tough one. Here, you need to clear all four locks out so that the space they occupy is empty. The way the arrows work are as follows:
- First arrow controls the first and third locks.
- Second arrow controls the first, second, and fourth locks.
- Third arrow controls the third and fourth locks.
- Fourth arrow controls the second and fourth locks.
Patience is a virtue here, as this puzzle is a doozy, but once you finish it, you’ll be rewarded with the magnifying lens. With this, you can head back to the desert world. Once there, head to the floating elevator and then right until you find the focusing machine that the laser is hitting. You need to attach the spare part and the lens to it and then head right to the room with the switch. Click the switch and the laser will be shot up to the space station.
The space station power puzzle
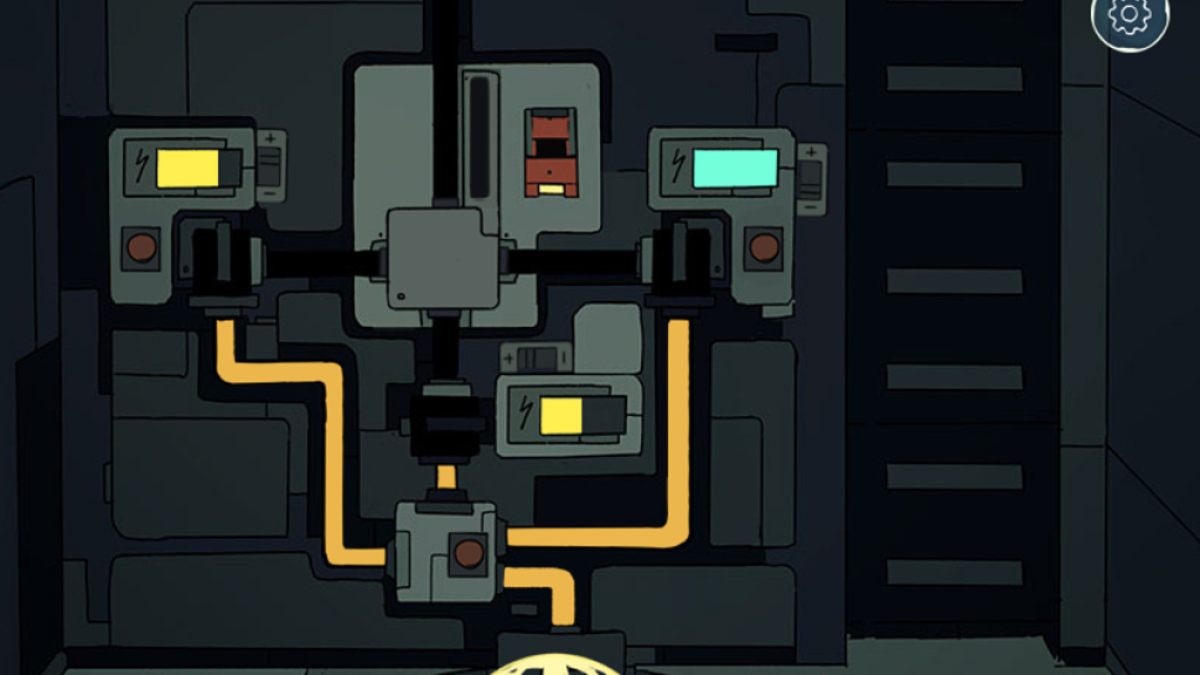
Head back to the space station and descend the ladder below. Here, you’ll find another challenging puzzle involving the wheel above and the power machines below, of which there are three. By default, the wheel will have the line symbol facing down, and for this symbol you need to array the power machines in the colors above and press the red button on each of them before clicking the switch. This will light up the wheel above.
Click the left arrow on the wheel to spin it to the three lines symbol, then head back down to the power machines. Array the power machines as follows, then repeat the process from the first time:

Head back up and hit the left arrow on the wheel to set it to the segmented line before heading back down for the last time. To finish the third symbol, array the machine as follows before repeating the steps from the first and second symbol:
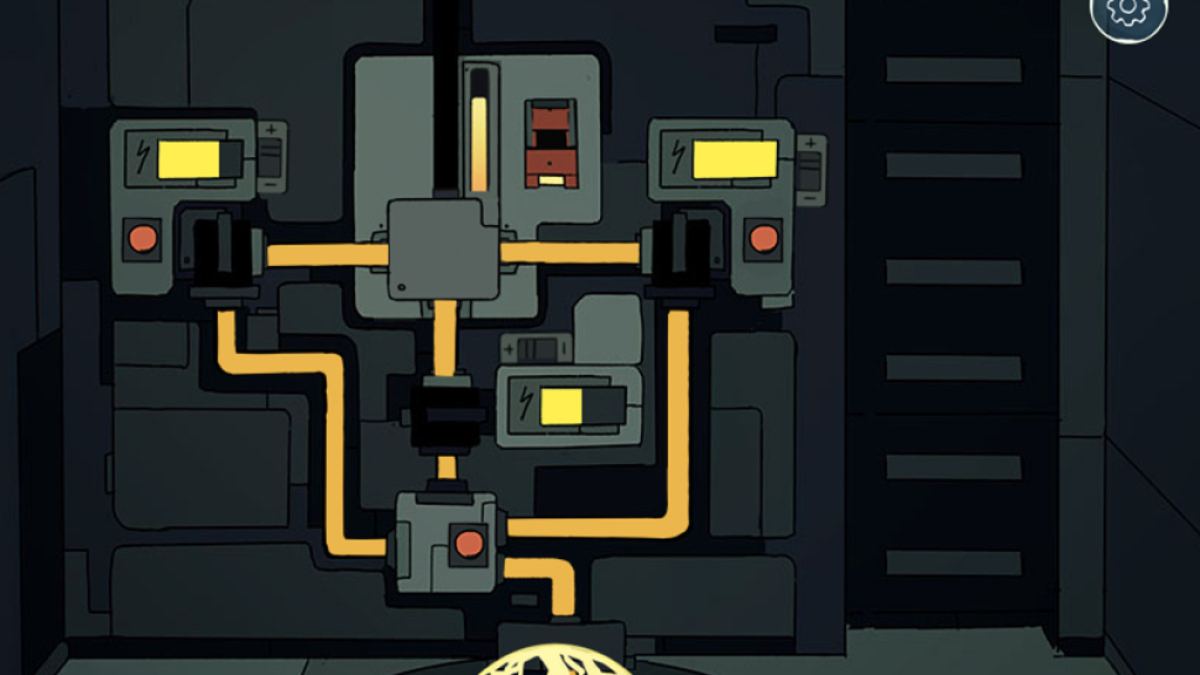
Once all three symbols on the wheel are lit up, click the red button next to it and it will give you access to the sealed door next to it on the wall. Open the door and pick up the skull cup within.
From here, head all the way back to the skull room where you solved the dial puzzle previously. When you get there, descend into the strange blue machine room and place the skull inside the cube alcove before pressing the red button. A blue liquid will fill the skull cup, and once it is done you need to pick it back up.
Head all the way to the top of the tree and insert the skull cup into the cube alcove there. Press the red button and the blue liquid will filter out of the skull cup, melting the metal seal on the tree right below it.
Related: Best websites for Unblocked Games
The blue wall cube puzzles
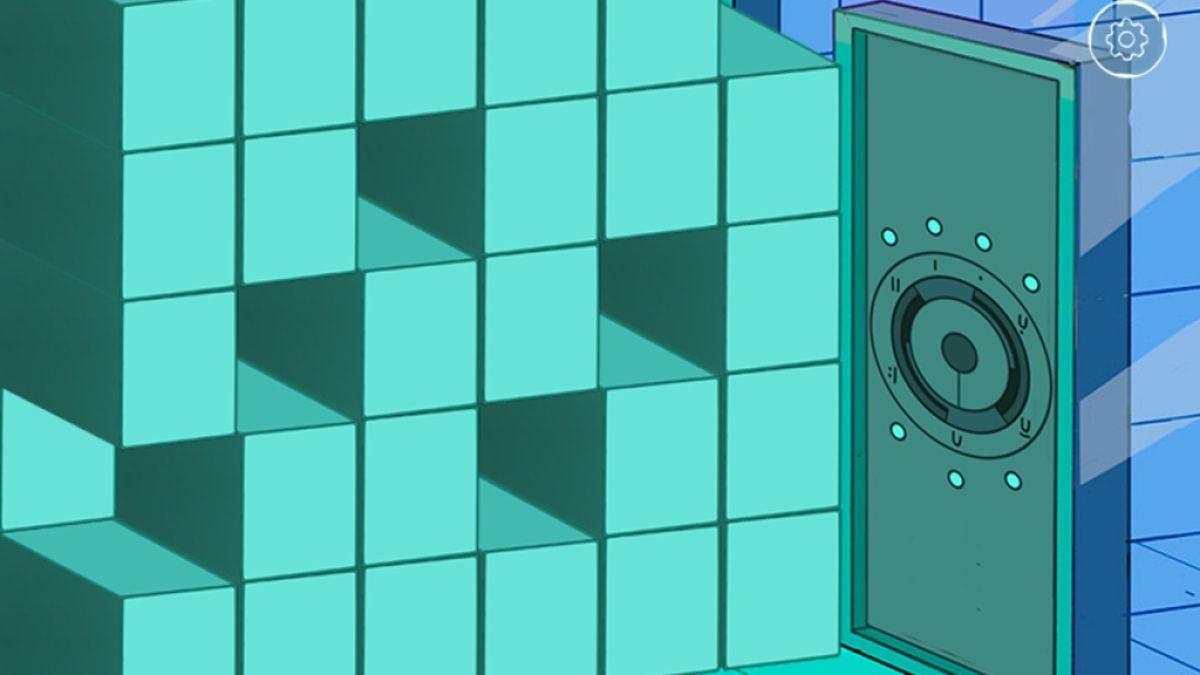
Head into the hole where the metal seal was and descend until you find the blue door on your left. Inside you’ll find a wall of cubes you can click on to move. This is actually a puzzle, and the solution is quite complicated. Each row needs to be arrayed in exactly this way from bottom to top and right to left:
- Row one must be six cubes.
- Row two must be two cubes, a space, then two cubes, then another space.
- Row three must be one cube, a space, two cubes, a space, then one cube.
- Row four must be three cubes, a space, then two cubes.
- Row five must be a space followed by five cubes.
You can consult the image above for the finished puzzle, but you will know you have finished it when you can leave the room and descend further into the tree. However, first you need to then reset the puzzle and rearrange it into a different pattern. The new pattern will help solve another puzzle later, so rearrange the wall like so:
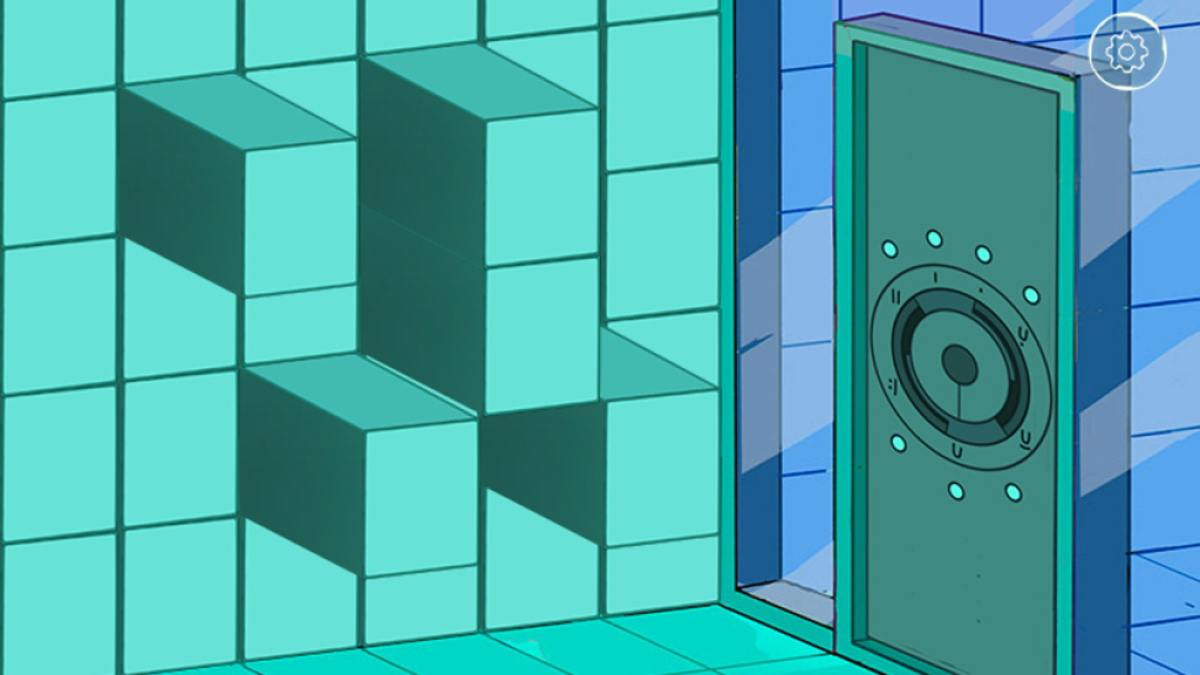
From here, head back to the upper hole in the tree trunk and take the ladder down on your right. You will find a door there and inside will be another blue wall block puzzle. This time, the solution is much simpler and will only take a few seconds. However, be sure you set up the puzzle above correctly, otherwise solving this puzzle will have no effect. The solution can be found below:
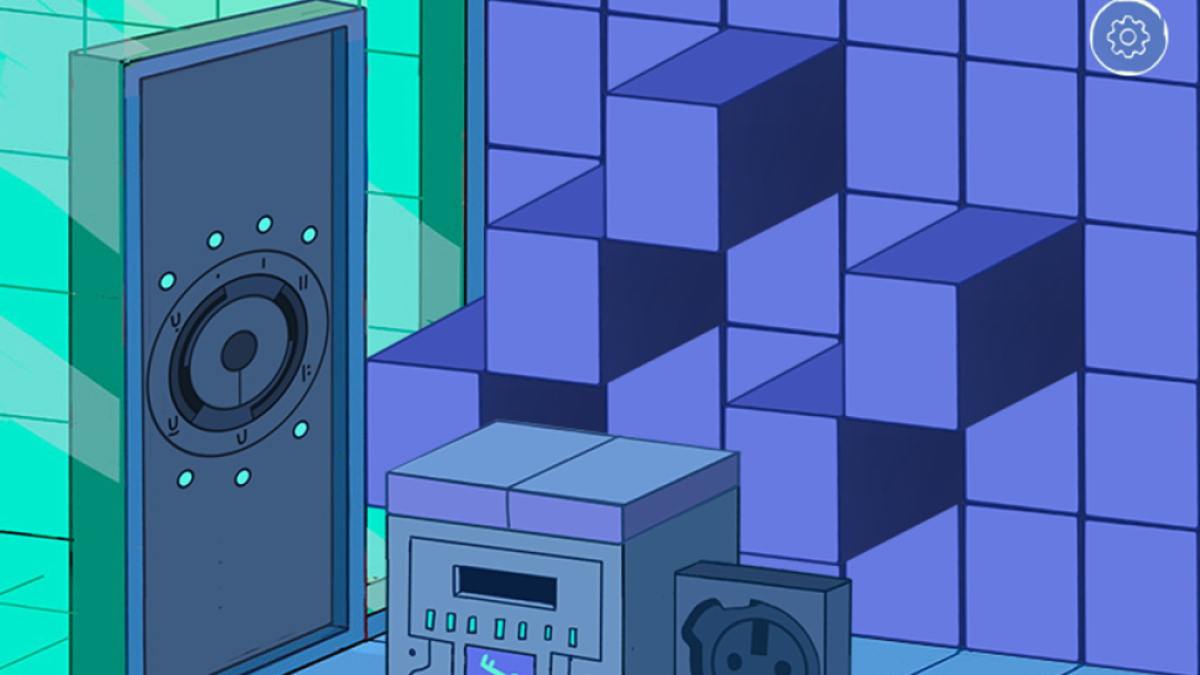
As seen above, when you finish this puzzle a metal box will rise out of the floor. The box has a symbol on the front that looks like a key. This is to prompt you to give all seven keys you have to the box. After doing so, a disc tray will pop out of the right side of the box and will have strange disks in it. Be sure to click it multiple times to pick up all of the disks.
From here, you can head to the bottom opening melted into the tree and inside the trunk you can head left to find a normal door. This door will lead to an area with floating symbol messages that correspond to secret symbols. These are not integral to completing the game, but if you wish to find them all you can read the directions below.
For those who want to finish the game, there is a cave to the left and past the door. Head up and into it and you’ll find a large circular door. Use the strange disks on the door to view a series of messages, then step through to complete the game!
All of the secret symbol puzzles
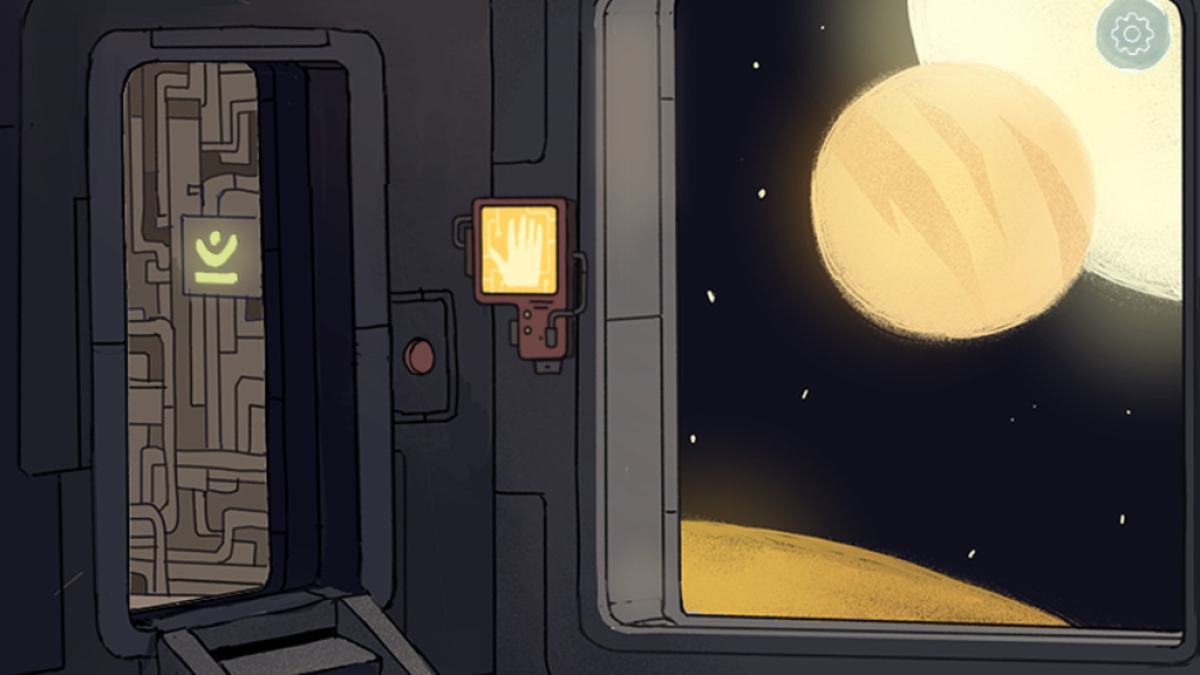
If you used the red button earlier in the space station, you have already found one of the four secret symbols within the game. However, there are still three left to uncover, and each of them is locked behind their own puzzle. Uncovering these symbols unlocks special notes from the developers that can be found to the right of the door that leads to the final cave area and the end of the game.
Let’s start with the easiest as you have already solved its puzzle previously by setting the circular switches on the tree trunk near the hand saw and shovel. Head inside the tree trunk through one of the burnt-out holes you made, then descend all the way to the bottom. You will find a room with two circular switches that will be lit up in blue light. To the left there will be a hole in the floor you can descend, and within the hole will be one of the secret symbols.
The next symbol can be found within the room with a ladder where you found the brown key previously. You need to head back there and walk into the adjoining room. Within you will find a seemingly endless series of rooms to the left and right. These rooms are actually a puzzle tied to the key pad next to the entrance. This puzzle’s solution actually differs for each unique playthrough, but the solution is simple. Within the rooms there are lights on the wall in front of you that can be switched to red or white. Begin going through the rooms and turning all of the lights to red. Begin cycling through the rooms to make sure all of the lights are red. Note that you will have less than thirty rooms total, so once you hit thirty clicks you’re good to go. From here, change one room light back to white and walk back through the rooms, counting as you go. The white light will serve as your end mark, telling you exactly how many rooms there are in total. Once you have the number, head back to the key pad and enter it. If done correctly, a slot will open in the floor near the entrance that has one of the secret symbols within.
The last symbol can be found back in the tree trunk in one of the doors, but first we are going back to the room containing the torture chair and device from earlier where we first gathered the green cylinder. Within you may have seen the code letters on the wall under the glass pane. These code letters are actually the solution to the next puzzle:

Memorize the code or consult the image above, then head back into the tree trunk. You need to find the door that is directly below and to the right of the first cube wall puzzle. You’ll know it’s the right room because you can see the torture room through its window. Here, there will be a combination code on the wall next to the entry door. Use the code letters above to solve it and you’ll see a secret compartment open back in the torture room. Head back there to find the last of the secret symbols.
Looking for more information on free games? Check out the Best Mobile IO Games and How to change your name in Fall Guys from MyFullGames!